This chapter shows you how to control access to your system as well as your files and directories. After reading this chapter, you will be able to:
A good way to learn about the topics in this chapter is to do the examples so that the information on your screen is consistent with the information in this book.
Before you can work through the examples, you must be logged in and your login directory should be in the state that you left it after doing the examples in Chapter 4. Your login directory should contain:
file1,
file2,
file3,
record1,
and
record6
reports
that contains the
file1,
file2,
file3,
and
notes
files and the subdirectory
newstatus
project
subdirectory that contains the files
file1,
file2,
file3,
and
notes
as well as the subdirectory
status
If you are using files with different names, make the appropriate substitutions as you work through the examples.
Before a user can log in successfully, the user must be made known to the system by the creation of a user account. Adding a user account is a routine but critical activity that is usually performed by the system administrator.
When a user account is created, information about the new user is added to the following two files:
/etc/passwd
/etc/group
These files define who can use the system and each user's access rights.
In addition,
all other system security controls depend upon password and group
security.
The following sections describe the
/etc/passwd
and
/etc/group
files.
The
/etc/passwd
file contains records that define login accounts and attributes for all
system users.
This file can be altered only by a user
with
superuser
privileges.
See
Section 5.7
for more information.
Each record in the
/etc/passwd
file
defines a login account for an individual user.
The fields are separated by colons and the last field ends with a
newline character.
The following text shows the format of an
/etc/passwd
file entry and describes the meaning of each field:
username:password:UID:GID:user_info:login_directory:login_shell
username
password
UID
GID
user_info
login_directory
login_shell
login
program after you successfully log
in to the system. It is normally a shell
program used to
interpret commands. For more information on shells, see
Chapter 7
and
Chapter 8.
The following example is a sample entry in the
/etc/passwd
file:
lee:NebPsa9qxMkbD:201:20:Lee Voy,sales,x1234:/users/lee: \
                                      /usr/bin/sh
The user account
lee
has user ID 201 and group ID 20.
Lee's full name is Lee Voy, and his department and telephone
are listed. The login
directory is
/users/lee
and
the Bourne shell
(/usr/bin/sh)
is defined as the command interpreter.
The password field contains Lee's password in encrypted form.
The
/etc/group
file defines login accounts for all groups using the system.
This file can be altered only by a user
with superuser privileges. See
Section 5.7
for more information.
Each record in the group database defines the login account of one group. Groups provide a convenient way to share files among users with a common interest or who are working on the same project.
Each entry in the
/etc/group
file is a single line that contains four fields. The fields
are separated
by colons, and the last field ends with a newline character.
The following text shows
the format of each entry and describes the meaning of each field:
groupname:password:GID:user1[, user2, ..., userN ]
groupname
password
GID
usernames
The operating system has a number of commands that enable you to control access to your files and directories. You can protect a file or directory by setting or changing its permissions, which are codes that determine the way in which anyone working on your system can use the stored data.
Setting or changing permissions is also referred to as setting or changing the protections on your files or directories. You generally protect your data for one or both of the following reasons:
Caution
Your system may allow two or more users to make changes to the same file at the same time without informing them. If this is so, the system saves the changes made by the last user to close the file; changes made by the other users are lost (some text editors warn users of this situation). It is therefore a good idea to set file permissions to allow only authorized users to modify files. The specified users should then communicate about when and how they are using the files.
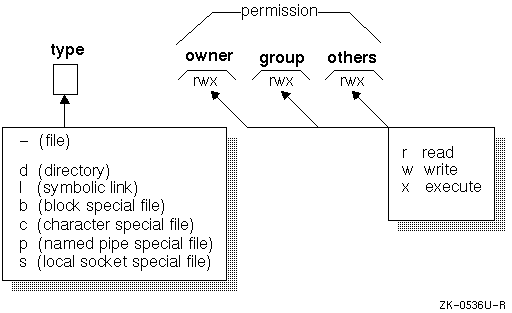
Each file and each directory has nine permissions associated with it. Files and directories have the following three types of permissions:
r
(read)
w
(write)
x
(execute)
These three permissions occur for each of the following three classes of users:
u
(user/owner)
g
(group)
o
(all others; also known as "world")
The
r
permission allows users to view or print the file. The
w
permission allows users to write to (modify) the file. The
x
permission allows users to execute (run) the file or to search
directories.
The
user/owner
of a file or directory is generally the person who created
it. If you are the owner of a file, you can change the file permissions with
the
chmod
command, which is described in
Section 5.4.
The
group
specifies the group to which the file belongs. If you are
the owner of a file, you can change the
group ID of the file with the
chgrp
command, which is described in
Section 5.8.
Note
If you do not own a file, you cannot change its permissions or group ID unless you have superuser authority. See Section 5.7 for more information.
The meanings of the three types of permissions differ slightly between ordinary files and directories. See Table 5-1 for more information.
| Permission | For a File | For a Directory |
r (read)
|
Contents can be viewed or printed. |
Contents can be read, but not searched.
Normally
r
and
x
are used together.
|
w (write)
|
Contents can be changed or deleted. | Entries can be added or removed. |
x (execute)
|
File can be used as a program. | Directory can be searched. |
To display the current file permissions, enter the
ls
command
with the
-l
flag. To display the permissions for a single file or
selected files, enter the following command:
$
ls -l
filename
The
filename
entry can be the name of the file or a list of filenames
separated by spaces. You may also use pattern-matching characters
to specify files. See
Section 5.4.1.3
for more information.
To display the permissions for all of the files in your current directory,
enter the
ls -l
command:
$
ls -l
total 7


-rw-r--r--  1 larry  system  101 Jun 5 10:03 file1
-rw-r--r--  1 larry  system  171 Jun 5 10:03 file2
-rw-r--r--  1 larry  system  130 Jun 5 10:06 file3
drwxr-xr-x  2 larry  system   32 Jun 5 10:07 project
-rw-r--r--  1 larry  system    0 Jun 5 11:03 record1
-rw-r--r--  1 larry  system    0 Jun 5 11:03 record6
drwxr-xr-x  2 larry  system   32 Jun 5 10:31 reports
$
The first string of each entry in the directory shows the permissions for that
file or directory. For example, the fourth entry,
drwxr-xr-x,
shows
the following:
d
notation)
rwx
sequence)
r-x
sequence)
r-x
sequence)
The third field shows the file's owner, (in this case,
larry),
and the fourth field shows the group to which the
file belongs, (in this case,
system).
To list the permissions for a
single directory, use the
ls -ld
command:
$
ls -ld reports
drwxr-xr-x   2 larry    system      32 Jun  5 10:31 reports
$
Taken together, all the permissions for a file or directory are called its permission code. As Figure 5-1 shows, a permission code consists of four parts:
d
a directory, and
l
a symbolic link. Any
other character indicates an I/O (Input/Output) device.
When you create a file or directory, the system automatically supplies a predetermined permission code. The following is a typical file permission code:
-rw-r--r--
This file permission code specifies that the owner has read and write permissions while the group and all others have read permission. The dashes (-) in some positions following the file-type notation indicate that the specified class of user does not have permission for that operation.
The following is a typical directory permission code:
drwxr-xr-x
This directory permission code specifies that owner has read, write, and search permissions, while the group and all others have read and search permissions.
The default permission codes that your system provides
relieve you from the task of specifying them explicitly every time
you create a file or directory. If you want to create your
own default permission codes, you must change
your user mask with the
umask
command. For an explanation of the
umask
command, see the description of the command in
Section 5.5.
Your ability to change permissions gives you a great deal of
control over the
way your data can be used. Use the
chmod
(change mode) command to
set or change the permissions for your files and directories.
For example, you obviously permit yourself to read, modify, and execute a file. You generally permit members of your group to read a file. Depending upon the nature of your work and the composition of your group, you often allow them to modify or execute it. You generally prohibit all other system users from having any access to a file.
Note
You must be the owner of the file or directory (or have superuser authority) before you can change its permissions. This means that your username must be in the third field in an
ls -llisting of that file.
It is important to realize that whatever restrictions you impose
on file and directory access, the superuser can always override them.
For example, if you use the
chmod
command to specify
that only you can have access to the
report20
file.
The superuser
can still access this file. For more information on this topic, see
Section 5.7.
There are two ways to specify the permissions set by the
chmod
command:
The following sections describe how to specify permissions with letters and operation symbols, as well as with octal numbers.
You can use letters and operation symbols to change file and directory permissions.
The following is the format of the
chmod
command when using letters
and operation symbols:
chmod
userclass-operation-permission
filename
The
userclass-operation-permission
entry actually represents three codes
that specify the user class, group, operation, and permission code
that you want to
activate. The
filename
entry is the name of the file or files whose
permissions you want to change.
You may also use pattern-matching characters
to specify files. See
Section 5.4.1.3
for more information.
User classes, operations, and permissions are defined as follows:
userclass:
u
User (owner)
g
Group
o
All others (besides owner and group)
a
All (user, group, and all others)
operation:
+
Add permission
-
Remove permission
=
Assign permission regardless of previous setting
permission:
r
Read
s
Set user or group ID
w
Write
x
Execute
In the following example, first enter the
ls -l
command to display the permissions for the
file1
file:
$
ls -l file1
-rw-r--r--   1 larry    system     101 Jun  5 10:03 file1
$
The owner (larry)
has read/write permissions while the group and
others have only read permissions.
Now, enter the
chmod
command with the flags
go+w.
This
command expands the permissions
for both the group
(g)
and for others
(o)
by
giving them write access
(+w)
to
file1
in addition to the read access they already have:
$
chmod go+w file1
$
Next, list the new permissions for the file:
$
ls -l file1
-rw-rw-rw-  1 larry    system     101 Jun  5 10:03 file1
$
You have given your group and all other system users
write permission to
file1.
The procedure for changing directory permissions is the same as that
for changing file permissions. However, to list the information about
a directory, you use the
ls -ld
command:
$
ls -ld project
drwxr-xr-x  2 larry  system  32 Jun 5 10:07 project
$
Now change the permissions with the
chmod g+w
command so that the
group
(g)
has write permission
(+w)
for the
directory
project:
$
chmod g+w project
$
ls -ld project
drwxrwxr-x  2 larry  system  32 Jun 5 10:07 project
$
If you want to make the same change to the permissions of all entries
in a directory, you can use the pattern-matching character
asterisk (*) with the
chmod
command. For information on
pattern-matching characters, see
Chapter 2.
In the following example, the command
chmod g+x *
gives execute
(x)
permission to the group
(g)
for all files
(*)
in the current directory:
$
chmod g+x *
$
Now enter the
ls -l
command to show that the group now has execute
(x)
permission for all files in the current directory:
$
ls -l
total 7
-rw-rwxrw-  1 larry  system  101 Jun 5 10:03 file1
-rw-r-xr--  1 larry  system  171 Jun 5 10:03 file2
-rw-r-xr--  1 larry  system  130 Jun 5 10:06 file3
drwxrwxr-x  2 larry  system   32 Jun 5 10:07 project
-rw-r-xr--  1 larry  system    0 Jun 5 11:03 record1
-rw-r-xr--  1 larry  system    0 Jun 5 11:03 record6
drwxr-xr-x  2 larry  system   32 Jun 5 10:31 reports
$
An absolute permission assignment
(=)
resets all permissions for a file
or files, regardless of how the permissions were set previously.
In the following example, the
ls -l
command lists the permissions
for the
file3
file.
Then the
chmod a=rwx
command gives all three permissions
(rwx)
to all users
(a).
$
ls -l file3
-rw-r-x-r-- 1 larry system 130 Jun 5 10:06 file3
$
chmod a=rwx file3
$
ls -l file3
-rwxrwxrwx   1 larry  system  130 Jun 5 10:06 file3
$
You can also use an absolute assignment to remove
permissions. In the following example, the
chmod a=rw newfile
command removes
the execute permission
(x)
for all groups
(a)
from the
file3
file:
$
chmod a=rw file3
$
ls -l file3
-rw-rw-rw-   1 larry  system  130 Jun 5 10:06 file3
$
You can also use octal numbers to change file and directory permissions.
To use octal number permission codes with the
chmod
command, enter the command in the following form:
chmod
octalnumber
filename
The
octalnumber
entry is a 3-digit octal number
that specifies the permissions for owner, group, and others.
The
filename
entry is the name of the file whose
permissions you want to change. It can be the name of the file
or a list of filenames
separated by spaces. You may also use pattern-matching characters
to specify files. See
Section 5.4.1.3
for more information.
An octal number corresponds to each type of permission:
4 = read
2 = write
1 = execute
To specify a group of permissions (a permissions field), add
together the appropriate octal numbers
(r,
w,
and
x
denote read, write, and execute
respectively):
3 = -wx (2 + 1)
6 = rw- (4 + 2)
7 = rwx (4 + 2 + 1)
0 = --- (no permissions)
Table 5-2 lists the eight possible permission combinations.
| Octal | Binary | ||
| Number | Number | Permissions | Description |
| 0 | 000 |
None
|
No permissions granted |
| 1 | 001 |
--x
|
Execute |
| 2 | 010 |
-w-
|
Write |
| 3 | 011 |
-wx
|
Write/execute |
| 4 | 100 |
r--
|
Read |
| 5 | 101 |
r-x
|
Read/execute |
| 6 | 110 |
rw-
|
Read/write |
| 7 | 111 |
rwx
|
Read/write/execute |
The entire permission code for a file or directory is specified with a
3-digit octal number, one digit each for
owner,
group,
and
others.
Table 5-3
shows some typical permission
codes and how they relate to the permission fields.
| Octal | Owner | Group | Others | Complete |
| Number | Field | Field | Field | Code |
| 777 |
rwx
|
rwx
|
rwx
|
rwxrwxrwx
|
| 755 |
rwx
|
r-x
|
r-x
|
rwxr-xr-x
|
| 700 |
rwx
|
---
|
---
|
rwx------
|
| 666 |
rw-
|
rw-
|
rw-
|
rw-rw-rw-
|
For example, you could use the following commands to change
the permission of
file3
using
octal numbers:
$
ls -l file3
-rw-rw-rw- 1 larry system 130 Jun 5 10:06 file3
$
chmod 754 file3
$
ls -l file3
-rwxr-xr--  1 larry  system  130 Jun 5 10:06 file3
$
Every time you create a file or a directory, default permissions
are established for it. These default permissions are initially
established either
by the operating system or the program you are running
(both will be considered to be the creating program in the
umask
description that follows). Setting default permissions relieves
you from the task of specifying permission codes explicitly every
time you create a file or directory. The operating system assigns
the default permission values of 777 for executable files and 666
for all other files.
If you want to further restrict whatever permissions are established
by a program when it creates a file or directory, you must specify a
user mask with the
umask
command.
The user mask is a numeric value that determines the access permissions when a file or directory is created. As a result, when you create a file or directory, its permissions are set to what the creating program specifies, minus what the umask value forbids.
The
umask
command has the following format:
umask
octalnumber
The
octalnumber
entry is a 3-digit octal number
that specifies the permissions to be subtracted from the default
permissions (777 or 666).
Setting the user mask is very similar to setting the permission bits discussed in Section 5.4.2. The permission code for a file or directory is specified with a 3-digit octal number. Each digit represents a type of permission. The position of each digit (first, second, or third) represents 3 bits that correspond to the following:
owner
of the file (you).
group
of the file.
others.
When you set the
umask,
you are actually specifying which permissions are
not
to be
granted regardless of the permissions requested by the
file creating program.
Table 5-4
lists the eight possible
umask
permission combinations for easy
reference. Note that the
umask
permission values are the
inverse
of those specified for regular permission codes. Also note
that these permission values are applied to those set by the creating
program.
| Allowed | ||
| Octal Number | Permissions | Description |
| 0 |
rwx
|
Read/write/execute |
| 1 |
rw-
|
Read/write |
| 2 |
r-x
|
Read/execute |
| 3 |
r--
|
Read |
| 4 |
-wx
|
Write/execute |
| 5 |
-w-
|
Write |
| 6 |
--x
|
Execute |
| 7 |
none
|
No permissions granted |
For example, if you specify a user mask of 027 (and the file is executable):
owner
is allowed all permissions requested by the program
creating the file.
group
is
not
allowed write permission.
others
are
not
allowed any permissions.
A good user mask value to set for your own files and directories depends upon how freely information resources are shared on your system. The following guidelines may be useful:
To show you how
umask
works, assume that you have entered the
following command:
$
umask 037
This command establishes a permission code of 740 (if the file is executable) and produces the following results:
Further, assume that you have just created a file. By default, your editor always assigns the following default permissions: owners are allowed all permissions, and all others only read and execute permissions. However, since you have previously set a user mask of 037, it further restricts the file permissions. As a result, the owner still has all permissions, but the group cannot execute the file, and all others have no permissions.
You may activate the
umask
command in two ways:
umask
command
in your login
script. This is the most common and efficient way to specify your
user mask
because the specified value is set automatically for you whenever you
log in. For a discussion of login scripts, see
Chapter 7.
For examples of
umask
commands in login scripts, see
Chapter 8.
umask
command at the shell prompt during a login session. The user mask value
you set is in effect
for that login session only.
For a more detailed example of how the user mask works in restricting permissions for files you create with a text editor, follow the steps in this procedure:
$
umask
If the user mask value is 000, there are no restrictions on the permissions established by file-creating programs. Go to step 3.
If the user mask value is set, write it down. Go to step 2.
Enter the following command:
$
umask 000
ls -l
command.
We will assume for the sake of the example that
read/write permissions are granted for all users:
$
ls -l
-rw-rw-rw-  1 user-name   15 Oct 27 14:42 yourfile
$
022
by entering the following command:
$
umask 022
A user mask of 022 establishes the following permission restrictions: owners are allowed all permissions and all others are allowed only read and execute permissions.
ls -l
command:
$
ls -l
-rw-r--r--  1  user-name   15 Oct 27 14:45 yourfile2
$
Notice that the write permissions for the group and all others have been removed in accordance with the user mask value of 022.
Note
A user with superuser privileges can override whatever access restrictions you impose on files and directories. For more information on this topic, see Section 5.7.
On occasion, the results you obtain when specifying a user mask may vary from what you intended. If so, see your system administrator.
The operating system provides a default user mask value of 022, which allows the owner all permissions, but prevents members of your group or any other users from writing to your files. However, your system's user mask default may vary.
The
su
command
allows you to alter your
identity during a login session. A reason for altering your
identity is to be able to access files that you do not own.
To protect system security, you should not assume another
identity without
the owner's or the system administrator's permission.
The
su
command allows you to log in to
another user's account only if you
know that user's password.
The
su
command authenticates you and then
resets both the process's user ID and the
effective user
ID to the value
of the newly specified user ID. The effective user
ID is the user
ID currently in effect for
the process, although it may not be the user ID of the person logged in.
The format of the
su
command is:
su
username
The
username
entry is the username of the person whose identity
you want to assume.
If after altering your identity, you want to confirm what identify you
have assumed, use the
whoami
command. This command displays the username of the identity
you have assumed.
After completing your work under a new identity, you should return to
your own login identity.
To do so, press
Ctrl/D
or enter the
exit
command.
The following example shows how Juan assumes Lucy's identity
with the
su
command,
confirms it with the
whoami
command, removes a file, and then returns to his own login identity with
the
exit
command:
$
su lucy
Password: ...
$
whoami
lucy
$
rm file9
$
exit
$
whoami
juan
$
For more information,
see the
su(1)
and
whoami(1)
reference pages.
Every system has a superuser who has permissions that supersede those of ordinary users. This superuser is often referred to as root.
The root user has absolute power over the running of the system. This user has access to all files and all devices and can make any changes to the system. The root user is said to have superuser privileges.
The following is a list of tasks ordinarily performed by root users:
/etc/passwd)
mount
or
reboot
Many of the preceding tasks are performed by system administrators who require superuser privileges. The system administrator's job is to manage the system by performing the preceding tasks, installing new software, analyzing system performance, and reporting hardware failures.
Depending upon your computing environment, you may or may not be the system administrator for your system or have root privileges. Your site configuration as well as your job responsibilities will determine your privileges.
If you work from a terminal or workstation that accesses a centralized system, you will probably not be the system administrator or have root privileges. In this situation, the system administrator, who is in charge of maintaining, configuring, and upgrading the system, will be the person who has root privileges.
If you perform your tasks from a workstation that is either independent or networked to other workstations or systems, you may indeed have root privileges for your own workstation, but not be the system administrator of your site. In this situation, you would maintain your own workstation only. However, the system administrator would still maintain shared machines and networks.
To become a root user, use the
su
command. You must also know the password for the root user.
The format of the
su
command is:
su root
The following example shows how Juan becomes a root user to perform an administrative task:
$
su root
Password: ...
# _
The new prompt,
a
number sign (#),
indicates that Juan has become a root user and that a shell has been
created for his use.
The root user shell (often the C shell) is defined in the
/etc/passwd
file. Juan may now perform the administrative task.
Caution
Because the root user has absolute power over the system, the password should be carefully protected. Otherwise, unauthorized use of the system may result in corruption or destruction of data.
After completing your work as the root user, you should return to
your own login identity.
To do so, press
Ctrl/D
or enter the
exit
command. You are then returned to the system prompt.
In addition to setting permissions, you can control how a file or
directory is used by changing its owner or group. Use the
chown
command to change the owner and the
chgrp
command to change the group.
Note
In order to use the
chowncommand, you must have superuser privileges. For more information on this topic, see Section 5.7.
Enter the
chown
command in the following form:
chown
owner
filename
The
owner
entry is the username of the new owner of the file.
The
filename
entry is a list of one or more files whose ownership you
want to change.
You may also use pattern-matching characters
to specify files. See
Section 5.4.1.3
for more information.
Enter the
chgrp
command in the following form:
chgrp
group
file
The
group
entry is the group ID or group name of the new
group. Note that to change the group ownership of a file, you
must be a member of the group to which you are changing the file.
The
file
entry is a list of one or more files whose ownership you
want to change.
For more information, see the
chown(1)
and
chgrp(1)
reference pages.
The security guidelines enforced at your site protect your files from unauthorized access. See your system administrator for complete information about security guidelines.
In addition, it is wise to avoid running untrusted software (software that is from an unknown source or that has not been validated for system security). When you run a program, that program has all of your access rights, and nothing prevents the program from being used to illicitly access, observe, or alter sensitive files.
You should be aware of three types of programs that compromise security:
A trojan horse is a program that performs, or appears to perform, its defined task properly; however, it also performs hidden functions that may be malicious. A trojan horse program emulates the program that you intended to run, but may perform an unwanted action. It might vandalize your files by altering or deleting them, or compromise the files by making illegal copies of them.
A typical trojan horse is the
login
trojan horse, which mimics
the system's login prompt on the display and waits for you to enter a
username and password. The program mails or copies this information
to the user responsible for the trojan horse. As the trojan horse
exits, it displays
Login incorrect.
The real
login
program then runs. Most users assume they typed the password
incorrectly, and are unaware that they were deceived.
A computer worm is a program that moves around a computer network, making copies of itself. For example, a login computer worm can log in to a system, copy itself onto the system, start running, log in to another system, and then continue this process indefinitely.
A computer virus program is really a type of trojan horse. Normally, a trojan horse waits passively for the right user to run it (usually a privileged user). Viruses spread by inserting themselves in other executable files, thus increasing the threat and extent of compromise of privacy or integrity.
Be careful of programs that were not installed by the person who administers your system. Programs that are obtained from bulletin boards and other unknown origins are particularly suspect. Even if the program includes source code, it is not always possible to examine the program carefully enough to determine if it is trustworthy.