![]()
![]()
![]()
![]()
![]()
![]()
![]()
There are two methods for inputting Japanese characters:
- Romaji-to-Kanji
- Kana-to-Kanji
- Internal code
- JIS Ku-ten code
In this document, these four conversion methods are collectively referred to as Kana-Kanji Conversion.
![]()
![]()
![]()
![]()
![]()
![]()
![]()
For the Japanese versions of VT terminals (VT282-J, VT382-J, and VT383-J) Kana characters are entered in the Kana input mode. The Kana input mode is provided by the firmware of the terminals and is activated by pressing the [カナ] key, which is located on the lower-left side of the main keyboard. For details, see Chapter 6, Keyboards. In the Kana mode, you can enter Kana characters by pressing the keys on the main keyboard, as if entering English characters.
![]()
![]()
![]()
![]()
![]()
![]()
![]()
The X Window System provides a mechanism for associating encodings of symbols which are usually printed on keycaps (called KeySyms) with physical or logical keys. Each key can be associated with a list of KeySyms. Depending on the Shift/Lock state, different KeySyms are obtained by pressing the same key. For instance, in the case of the American keyboard, the input of 3 or # is switched by the Shift state. The mechanism for supporting two KeySyms per key was insufficient for some languages, such as Hebrew and Japanese. Therefore, the Mode Switch mechanism was added to the X Window System to allow switching of Group 1 and Group 2 characters, where Group 1 is for ASCII KeySyms and Group 2 is for native language characters. That is, the Mode Switch mechanism works as a Group Shift key for these languages.
In addition, you can input different sets of characters through the same keyboard by changing the associated KeySyms.
In X Consortium's release of the X Window System, the Mode Switch On state is effective only for entering one single character. After a character is entered, the Mode Switch state is reset. In the DIGITAL UNIX implementation, the Mode Switch mechanism is enhanced to support both single-shot switching and lock-shift switching, depending on the keymap definition. In the latter case, once the Mode Switch state is set, it remains unchanged until the Mode Switch key is pressed again to modify the state. Table 7-1
DIGITAL UNIX windows environment (CDE and DECwindows Motif) provides the keymaps shown in Table 7-1 for setting Japanese KeySyms.
Keymap |
Keyboard |
|---|---|
JAPANESE_LK201AJ |
LK201-AJ |
JAPANESE_LK401AJ |
LK401-AJ/LK40W-AJ |
JAPANESE_LK401JJ |
LK401-JJ |
JAPANESE_LK401BJ |
LK401-BJ |
JAPANESE_LK421AJ |
LK421-AJ |
JAPANESE_LK421JJ |
LK421-JJ |
JAPANESE_LK411AJ |
LK411-AJ/LK41W-AJ |
JAPANESE_LK411JJ |
LK411-JJ/LK41W-JJ |
JAPANESE_PCXAJAA |
PCXAJAA/LK97W-AJ |
All the keymaps in Table 7-1 support locking-shift mode switching. With these keymaps, you can enter English characters in the Mode Switch Off state and Kana characters in the Mode Switch On state.
The effect of setting the Mode Switch on is similar to that of entering the Kana input mode on Japanese VT terminals.
![]()
![]()
![]()
![]()
![]()
![]()
![]()
The procedures for activating the Kana input mode on VT terminals and CDE/DECwindows Motif are similar. You must load a Japanese keymap in order to input Kana characters on DECwindows Motif; for VT terminals, you can skip this step.
To load a Japanese keymap, choose the Keyboard... menu item from the Options menu of Session Manager. The keyboard dialog box displays and you can choose one of the Japanese keymaps according to the type of the keyboard connected to your workstation. For instance, if you are using a Japanese LK401-AJ keyboard, choose the japanese_lk401aj item, and so on.
The keymap is a global attribute to a display device. After you select a keymap, the keymap is effective to all client applications running on your display device. If you plan to run applications in different languages, check for any conflicts between the keymap you are using and the keymap required by those languages.
![]()
![]()
![]()
![]()
![]()
![]()
![]()
The key sequences for activating the Kana input mode are shown in Table 7-2.
Keyboard Type |
Kana Key Sequence |
|---|---|
VT Terminals |
[カナ] |
CDE/DECwindows Motif
|
[カナ/Space] |
|
[カナ] |
Note
The [カナ] key is equivalent to the [Compose] key on the standard LK201 keyboard or the [Left-Compose] key on the standard LK401 keyboard.
You can press the appropriate Kana key sequence to toggle between English input mode and Kana input mode. If a keyboard has a mode-switch LED for Kana mode, it is switched on or off according to the input mode. (See Table 6-1 for keyboard LEDs.) The DIGITAL UNIX Keyboard Indicator utility provides visual feedback of the input mode for keyboards without the LED. For details, see Writing Software for the International Market.
![]()
![]()
![]()
![]()
![]()
![]()
![]()
To input English characters, make sure the Kana mode is set off. In this state, you can input English letters, numeric characters, and punctuation marks by pressing keys on the main keyboard. On a Japanese keyboard, the English characters or symbols that are entered are printed on the left-hand side of the keycaps.
![]()
![]()
![]()
![]()
![]()
![]()
![]()
To input Kana characters, make sure the input mode is set to Kana. In this mode, you can input Kana characters by pressing keys on the main keyboard.
For example, if you press the [A] key when the Kana mode is set on, the Hiragana character ち or the Katakana character チ are entered, depending on the default application setting or the input method parameters. For instance, you can control whether Hiragana characters or Katakana characters are entered by including the following resource in the IMlib profile data files im_profile*.dat file.
DEC-JAPANESE.ECHO.kana : hiragana
The default profile data files provided by the DIGITAL UNIX operating system are found in $I18NPATH/jsy/imlib. You can change the default value of hiragana in the resource file to katakana or jiskana.
On a Japanese keyboard, the Katakana characters that are entered are printed on the right side of the keycaps.
For example, to enter Kana mode, press [kana/Space] on the LK201-AJ keyboard, Right-[Control] on the PCXAJ-AA keyboard, or [kana] on the other Japanese keyboards. Press the same key again to go back to ASCII mode.
For details about Japanese keymaps, see Chapter 6.
![]()
![]()
![]()
![]()
![]()
![]()
![]()
For character-cell terminal applications, Japanese input methods are provided either by the applications themselves or through the internationalized tty terminal driver.
If your application handles the input of Japanese data, refer to the application's documentation for the details of Japanese input methods.
For details about customizing your terminal driver settings using the stty command to enable Kana-Kanji conversion, see Writing Software for the International Market.
![]()
![]()
![]()
![]()
![]()
![]()
![]()
DECwindows Motif implements Japanese input methods in the form of an independent process, called the input server. The Japanese input server is an X client process that works on a standard X-server if the required Japanese fonts are installed. This means that the process can run on any system which can access your X display device, including the device itself.
You can write internationalized applications using standard X11R6 or OSF/Motif R1.2 application programming interfaces to talk to this input server. For details on developing internationalized software with X11R6 and OSF/Motif R1.2, see Writing Software for the International Market.
Before you can input Japanese data, you must start the Japanese input server on your workstation or any system that can be accessed by your workstation through the network.
To start the input server on the workstation that you are using, enter the following command:
% /usr/bin/x11/dxjim &
To start the input server on a remote system, enter the following command on that system:
% setenv DISPLAY <display-name>
% /usr/bin/x11/dxjim &
where <display-name> is the display name for your workstation.
Once the Japanese input server is invoked, the applications that were internationalized with X11R6 Xlib or OSF/Motif R1.2 to support Japanese can communicate with the server to provide input method services.
![]()
![]()
![]()
![]()
![]()
![]()
![]()
You can interact with the Japanese input server through a Motif-style user interface that allows an input method to provide feedback about the data being edited. This feedback helps you compose a character, list choices for selection, provide options for customizing the input server, and so on.
The X Input Method specification defines the three input areas described in Table 7-3.
Area |
Description |
|---|---|
Auxiliary area |
An option menu helps you customize the Japanese input methods and the input method window. |
Status area |
This area displays the internal state of the Japanese input method that is critical to you. |
Pre-edit area |
This area displays the intermediate text that is being composed. This area also provides a lookup region which displays a list of valid candidates for the input key sequences. |
![]()
![]()
![]()
![]()
![]()
![]()
![]()
The use of the input areas depends on the interaction style (or pre-edit style) selected for the application. The Japanese input server supports three interaction styles:
![]()
![]()
![]()
![]()
![]()
![]()
![]()
If you want to display the pre-edit data in a separate input window which lies outside the application window, choose the root window interaction style. The input window is scaleable and movable; you can modify its size and position to meet your preferences.
You can press [Shift/Space]1 to toggle between the Japanese input mode and the English input mode. When you are in the Japanese mode, the keys that you press are displayed inside this root window. Conversion operations can be performed on this pre-edit data to compose Japanese characters. When the pre-edit data is converted to the Japanese characters that you want, press [Return] to accept the Japanese characters and send them to the application.
1This toggle key sequence is customizable through the Japanese input server user interface.
![]()
![]()
![]()
![]()
![]()
![]()
![]()
If you want to focus your attention at the point of insertion during Japanese data input, you can choose the on-the-spot interaction style. In this style, the Japanese input server directs your applications to display the pre-edit data in a way which is consistent with the appearance of the existing data in the input field. For instance, an application can select the font size and typeface to display the pre-edit data and control how the data is highlighted. Formatting of existing data can also be performed to allow the pre-edit data to be displayed at the insertion point.
![]()
![]()
![]()
![]()
![]()
![]()
![]()
Another alternative which allows you to perform Japanese data input at the point of insertion is the over-the-spot interaction style. In this style, an input window is created when you invoke the Japanese input mode; the window is placed over the current point of insertion. The pre-edit data entered is displayed in this window. The look-and-feel is similar to that of the on-the-spot style, except that applications do not control the display attributes of the pre-edit data and will not perform any formatting to accommodate the pre-edit. Therefore, there is less communication overhead between the Japanese input server and applications. The performance of data entry through the over-the-spot interaction style is better.
You can press [Shift/Space]2 to toggle between the Japanese input mode and the English input mode. When you are in the Japanese input mode, the keys that you press are underlined and displayed in a pre-edit window right over the point of insertion. Conversion operations can be performed on this pre-edit data to compose Japanese characters. When the pre-edit data is converted to the Japanese characters that you want, press [Return] to accept the Japanese characters and send them to the application.
2This toggle key sequence is customizable through the Japanese input server user interface.
![]()
![]()
![]()
![]()
![]()
![]()
![]()
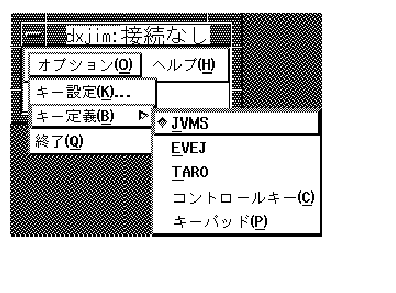
By default, the key sequence used to invoke the Japanese/English input mode and the one to confirm the acceptance of converted Japanese data are predefined as [Shift/Space] and [Return] respectively. You can change these default key sequences to meet your needs. You can customize the following key sequences from the Options menu of the Japanese input server:
The dialog box provides an interface that you can use to customize a key sequence. It allows you to select a trigger key and to toggle the on/off state of the Ctrl, Alt and Shift modifiers. The trigger keys that you can choose include NoSymbol, [F1] - [F20], [Space], [Return], [Compose], and [A] through [Z]. If you choose NoSymbol, no invocation sequence is provided for the selected action.
For each modifier key you can select the on/off state with the toggle buttons identified in Table 7-4.
Modifier |
On State |
Off State |
|---|---|---|
Ctrl |
"Ctrl" |
"~Ctrl" |
Shift |
"Shift" |
"~Shift" |
Alt |
"Alt" |
"~Alt" |
The tilde (~) sign means that you should not press that modifier key when invoking the action. In addition to the on/off state, you can deselect both of the states for a modifier key, that is, neither state is selected. To do this, click the toggle button that is currently set on. If you deselected a modifier, the invocation key with or without holding the modifier key can be accepted by the input server.
When one of the invocation key sequences is selected, for example, the Confirm Input key sequence, the state of the toggle switches and the trigger key displayed on the dialog box is updated to reflect the current value.
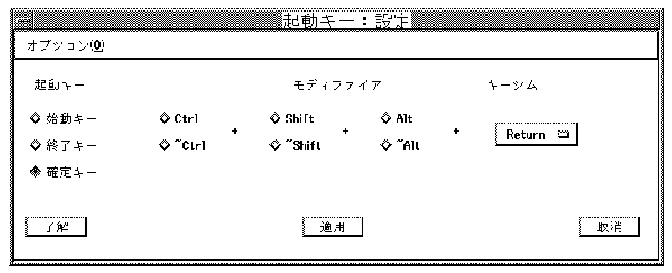
If you want to change the Confirm Input key sequence to [Ctrl/Return], select the Ctrl, ~Alt, and ~Shift buttons.
![]()
![]()
![]()
![]()
![]()
![]()
![]()
You can specify the priority of the interaction styles of DECwindows Motif applications by specifying the VendorShell resource, XmNpreeditType. By default, the resource value is "onthespot,overthespot,offthespot,root". This list is in priority order. The first style will be used if it is available in an input method, else the second, and so on.
You can use one of the following methods to choose your preferred interaction style:
% dxcardfiler -xrm '*preeditType: root' &
To start Cardfiler with the over-the-spot interactive style, you can enter:
% dxcardfiler -xrm '*preeditType: overthespot' &
To start Cardfiler with the on-the-spot interactive style, you can enter:
% dxcardfiler -xrm '*preeditType: onthespot' &
- From the Session Manager's Options menu, select Input Style... .
- In the popup Input Style Options window, click on one of the pre-edit styles.
- Navigate the selected pre-edit style through the Style Preference list by clicking on the up-arrow or down-arrow button.
- Repeat these steps until the priority list is the one you desire.
After you select your preferred interaction style, the applications you invoke will start up with the new setting.
![]()
![]()
![]()
![]()
![]()
![]()
![]()
The input of Japanese characters is implemented through the software conversion of phonetic codes representing their pronunciation. There are four types of input conversion methods:
![]()
![]()
![]()
![]()
![]()
![]()
![]()
The Romaji-to-Kanji and Kana-to-Kanji methods are performed by the conversion functions provided by the operating system. The conversion process involves the operations described in Table 7-5.
Operation |
Description |
|---|---|
HENKAN |
Converts the phonetic code input |
JI-KOUHO |
Selects another candidate for conversion |
MAE-KOUHO |
Selects the previous conversion candidate |
ICHIRAN |
Lists all conversion candidates |
KAKUDAI |
Lengthens the current phrase |
SHUKUSHOU |
Shortens the current phrase |
JI-BUNSETSU |
Moves to the next phrase |
MAE-BUNSETSU |
Moves to the previous phrase |
HIRAGANA |
Converts current input to Hiragana |
KATAKANA |
Converts current input to Katakana |
ZENKAKU |
Converts current input to full form alphabets |
HANKAKU |
Converts current input to half form alphabets |
KIGOU |
Converts current input to special graphic character |
MU-HENKAN |
No conversion is applied |
These operations are invoked by using the key sequences assigned to them, which vary according to different facilities, keyboard types, or user's customization. Several Japanese keyboards, such as LK401-JJ, LK401-BJ, and LK421-JJ provide special keys for the conversion input methods. These are shown in Table 7-6.
Key |
Key Label/Unshift |
Function/Unshift |
Key Label/Shift |
Functions/Shift |
|---|---|---|---|---|
1 |
変換(次候補) |
HENKAN or |
前候補 |
MAE-KOUHO |
2 |
無変換 |
MU-HENKAN |
無変換 |
MU-HENKAN |
3 |
ひらがな |
HIRAGANA |
カタカナ |
KATAKANA |
For details about Japanese conversion keys, see Chapter 6.
![]()
![]()
![]()
![]()
![]()
![]()
![]()
Table 7-7, Table 7-8, Table 7-9, Table 7-10, and Table 7-11 summarize the conversion operations and their associated key bindings for the following facilities:
All Japanese keyboards support these input key sequences. In addition to these sequences, the several keyboards also provide additional keys for issuing Japanese input conversion commands.
For the operating system commands and utilities, you can select your preferred key binding by defining the JSYKKSEQ environment variable or by using your private settings, which are stored in the ~/.jsykkseq file. The system default conversion key sequences are stored in the $I18NPATH/usr/skel/ja_JP file.
Note
The taro key binding is not supported by the DIGITAL UNIX operating system.
For DECwindows Motif, the key binding can be selected through the Options menu of the Japanese input server.
You can select your favorite key binding from the Key Binding cascade menu.
The set of conversion key sequences are all defined in IMlib profile data files located in the $I18NPATH/usr/jsy/imlib directory.
Note that in Tables 7-7 through Table 7-11, the ICHIRAN operation is supported only in DECwindows Motif.
Operation |
All Keyboards |
LK401-BJ, LK401-JJ, LK411-AJ(LK41W-AJ), LK411-JJ(LK41W-JJ), LK421-JJ, PCXAJ-AA, LK97W-AJ |
|---|---|---|
HENKAN |
[Ctrl/Space] or [Ctrl/@] or |
[変換(次候補)] |
JI-KOUHO |
[Ctrl/Space] or [Ctrl/@] or |
[変換(次候補)] |
MAE-KOUHO |
[Ctrl/G][Ctrl/Space] or |
[前候補] |
ICHIRAN |
[Ctrl/`] |
|
SHUKUSHOU |
[Ctrl//] or [Ctrl/_] or |
|
KAKUDAI |
[Ctrl/G][Ctrl//] or |
|
JI-BUNSETSU |
[Ctrl/P] or |
|
MAE-BUNSETSU |
[Ctrl/G][Ctrl/P] or |
|
HIRAGANA |
[Ctrl/L] |
[ひらがな] |
KATAKANA |
[Ctrl/K] |
[カタカナ] |
ZENKAKU |
[Ctrl/F] |
[Alt/ひらがな] |
HANKAKU |
[Ctrl/G][Ctrl/F] |
[Ctrl/Alt/ひらがな] |
KIGOU |
[Ctrl/]] |
[Alt/無変換] |
MU-HENKAN |
<Ctrl/N> |
[無変換] |
Operation |
All Keyboards |
LK401-BJ, LK401-JJ, LK411-AJ(LK41W-AJ), LK411-JJ(LK41W-JJ), LK421-JJ, PCXAJ-AA, LK97W-AJ |
|---|---|---|
HENKAN |
[Ctrl/Space] or [Ctrl/@] or |
[変換(次候補)] |
JI-KOUHO |
[PF1][Ctrl/Space] or [Ctrl/@] or [PF1][Space] |
[変換(次候補)] |
MAE-KOUHO |
[PF1][Ctrl/Space] [PF1] |
[前候補] |
ICHIRAN |
[Ctrl/@] |
|
SHUKUSHOU |
[Ctrl/`] |
|
KAKUDAI |
[Ctrl/A] |
|
JI-BUNSETSU |
[PF1][Ctrl/A] |
|
MAE-BUNSETSU |
[Ctrl/P] |
|
HIRAGANA |
[PF1][Ctrl/P] |
[ひらがな] |
KATAKANA |
[Ctrl/H] |
[カタカナ] |
ZENKAKU |
[Ctrl/K] |
[Alt/ひらがな] |
HANKAKU |
[Ctrl/F] |
[Ctrl/Alt/ひらがな] |
KIGOU |
[Ctrl/E] |
[Alt/無変換] |
MU-HENKAN |
[PF1][Z] |
[無変換] |
Operation |
All Keyboards |
LK401-BJ, LK401-JJ, LK411-AJ(LK41W-AJ), LK411-JJ(LK41W-JJ), LK421-JJ, PCXAJ-AA, LK97W-AJ |
|---|---|---|
HENKAN |
[Space] |
[変換(次候補)] |
JI-KOUHO |
[Space] |
[変換(次候補)] |
MAE-KOUHO |
[UpArrow] |
[前候補] |
ICHIRAN |
[Ctrl/`] |
|
SHUKUSHOU |
[RightArrow] |
|
KAKUDAI |
[LeftArrow] |
|
JI-BUNSETSU |
[DownArrow] |
|
MAE-BUNSETSU |
N/A |
|
HIRAGANA |
[F11] |
[ひらがな] |
KATAKANA |
[F12] |
[カタカナ] |
ZENKAKU |
[F14] |
[Alt/ひらがな] |
HANKAKU |
[F13] |
[Ctrl/Alt/ひらがな] |
KIGOU |
[Ctrl/]] |
[Alt/無変換] |
MU-HENKAN |
N/A |
[無変換] |
Operation |
All Keyboards |
LK401-BJ, LK401-JJ, LK411-AJ(LK41W-AJ), LK411-JJ(LK41W-JJ), LK421-JJ, PCXAJ-AA, LK97W-AJ |
|---|---|---|
HENKAN |
[KP7] |
[変換(次候補)] |
JI-KOUHO |
[KP7] |
[変換(次候補)] |
MAE-KOUHO |
[PF1][KP7] |
[前候補] |
ICHIRAN |
[Ctrl/`] |
|
SHUKUSHOU |
[KP4] |
|
KAKUDAI |
[PF1][KP4] |
|
JI-BUNSETSU |
[KP5] |
|
MAI-BUNSETSU |
[PF1][KP5] |
|
HIRAGANA |
[KP1] |
[ひらがな] |
KATAKANA |
[KP2] |
[カタカナ] |
ZENKAKU |
[KP3] |
[Alt/ひらがな] |
HANKAKU |
[KP9] |
[Ctrl/Alt/ひらがな] |
KIGOU |
[KP8] |
[Alt/無変換] |
MU-HENKAN |
[KP0] |
[無変換] |
Operation |
All Keyboards |
LK401-BJ, LK401-JJ, LK411-AJ(LK41W-AJ), LK411-JJ(LK41W-JJ), LK421-JJ, PCXAJ-AA, LK97W-AJ |
|---|---|---|
HENKAN |
[Ctrl/K] |
[変換(次候補)] |
JI-KOUHO |
[Ctrl/K] |
[変換(次候補] |
MAI-KOUHO |
[Ctrl/L] |
[前候補] |
ICHIRAN |
[Ctrl/`] |
|
SHUKUSHOU |
[Ctrl/A] |
|
KAKUDAI |
[Ctrl/X] |
|
JI-BUNSETSU |
[Ctrl/P][R] |
|
MAE-BUNSETSU |
[Ctrl/P][L] |
|
HIRAGANA |
[Ctrl/G] |
[ひらがな] |
KATAKANA |
[Ctrl/N] |
[カタカナ] |
ZENKAKU |
[Ctrl/E] |
[Alt/ひらがな] |
HANKAKU |
[Ctrl/T] |
[Ctrl/Alt/ひらがな] |
KIGOU |
[Ctrl/F] |
[Alt/無変換] |
MU-HENKAN |
[Ctrl/B] |
[無変換] |
![]()
![]()
![]()
![]()
![]()
![]()
![]()
The Romaji-to-Kanji input method converts Romaji to Kanji characters. You input English characters to represent the phonetic pronunciation of Japanese words or phrasaes, and then convert them to the correct ideographic Kanji.
You use the HENKAN command to start Romaji-to-Kanji conversion. To start the HENKAN command, enter the appropriate key sequence as defined in Table 7-7, Table 7-8, Table 7-9, Table 7-10, and Table 7-11.
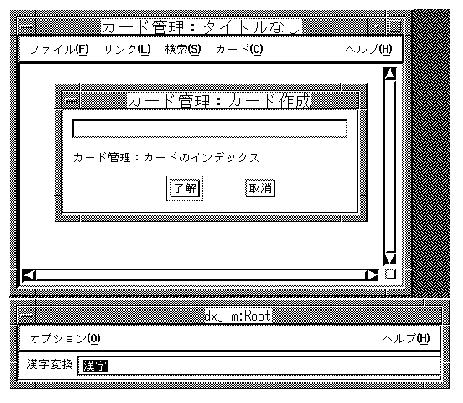
For example, the Romaji representation of "日本" which means "Japan" in English, is "nihon". To enter "日本", type "nihon" through the main keyboard and then press the HENKAN key sequence to convert "nihon" to "日本".
A Romaji string can represent more than one unique Japanese phrase. For example, the Romaji string "jin" can represent "人", "陣", "ジン", and so on. If the converted string is not the one you want, press the JI-KOUHO or MAE-KOUHO key sequence to select the next string or the previous string. To display the complete list of characters corresponding to the Romaji code entered, press the ICHIRAN key.
The Romaji entered is divided into phrases (called "BUNSETSU" in Japanese) and each phrase is converted to Kanji independently. The same Romaji string can be divided differently to form different groupings of phrases. For example, the Romaji string "kanji" can be divided into two phrases as "kan-ji" or three phrases as "ka-n-ji". If the grouping of phrases is not the one desired, press the SHUKUSHOU or KAKUDAI key sequence to modify the division and then revise the conversion of phrases.
Each of the divided phrases can be converted independently. When you press the HENKAN key sequence to convert Romaji containing more than one phrase, the first phrase is highlighted to show that you can further convert this phrase with the JI-KOUHO or MAE-KOUHO command. To convert the next phrase or the previous phrase, use the JI-BUNSETSU or MAE-BUNSETSU command to move to the next phrase or the previous phrase and apply the JI-KOUHO or MAE-KOUHO conversion command.
If you want to convert the Romaji to Hiragana or Katakana, press the HIRAGANA or KATAKANA key sequence. For example, the Romaji "kanji" can be converted to a Hiragana string "かんじ" or a Katakana "カンジ".
![]()
![]()
![]()
![]()
![]()
![]()
![]()
Using the Romaji-to-Kanji input method, you can input the Romaji in Alphabet input mode.
For example, to input "日本" using the Romaji-to-Kanji method, input the Romaji "nihon" by pressing the [N][I][H][O][N] keys. Usually, the input data is highlighted to indicate the Romaji for conversion.
Enter [N][I][H][O][N]
nihon_
![]()
![]()
![]()
![]()
![]()
![]()
![]()
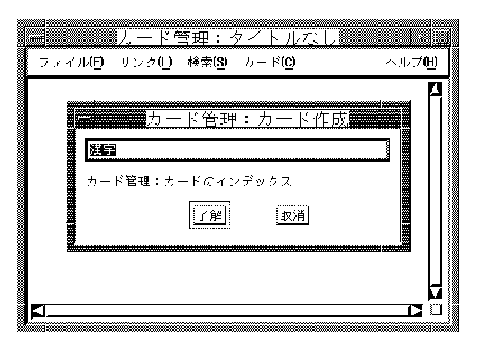
After entering the Romaji, press the key sequence designated for the HENKAN operation (see Table 7-7 to Table 7-11). The Romaji "nihon" is converted to "日本".
日本_
![]()
![]()
![]()
![]()
![]()
![]()
![]()
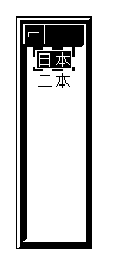
The string "日本" is not the only string represented by the Romaji "nihon". "二本" is another valid string. If "日本" is not the string you want, press the JI-KOUHO key sequence to display another string. For some applications, a list of valid strings is displayed to facilitate selection.
Note
The display of multiple strings is not supported in the CSText widget.
Press the JI-KOUHO key sequence:
二本_ 1.日本 2.二本
If you want to select the previous string, press JI-KOUHO. The previous string is displayed at the cursor position:
日本_ 1.日本 2.二本
![]()
![]()
![]()
![]()
![]()
![]()
![]()
If you are using CDE or DECwindows Motif, you can issue the ICHIRAN command to list all valid conversion strings. When you press the ICHIRAN key sequence, a selection box pops up and displays all candidates for your selection:
![]()
![]()
![]()
![]()
![]()
![]()
![]()
The Romaji "nihon" can be divided in various ways into different groupings of phrases, such as "nihon", "niho-n", and "ni-hon". You can use the KAKUDAI and SHUKUSHOU commands to modify the division of Romaji into phrases. For example, if you press the SHUKUSHOU key sequence after "nihon" is converted to "日本", the Romaji "nihon" changes to "niho-n" and the Japanese phrases for "niho" and "n" are displayed in place of "日本":
にほん_
Here "にほ" is the Japanese string for "niho" and "ん" is the Japanese string for "n". To facilitate conversion the phrase being converted is highlighted.
If you press the SHUKUSHOU key sequence again, the grouping changes from "niho-n" to "ni-hon" and the Japanese phrases for "ni" and "hon" are displayed:
荷本_
Here "荷" is the Japanese string for "ni" and "本" is the Japanese string for "hon". The first phrase, "荷", is now highlighted and you can convert this string further to other candidates, if applicable. For example, if you press the JI-KOUHO key sequence, the next candidate for "ni" is displayed:
似本_ 1.
To reverse the SHUKUSHOU command, press the KAKUDAI key sequence.
![]()
![]()
![]()
![]()
![]()
![]()
![]()
To move to the next phrase or the previous phrase for conversion, issue the JI-BUNSETSU or MAE-BUNSETSU command. In this example, you move to the "本" phrase by pressing the JI-BUNSETSU key sequence:
荷本_
The phrase "本" is highlighted.
![]()
![]()
![]()
![]()
![]()
![]()
![]()
If you want to convert Romaji or a divided phrase (that is, the highlighted string on the screen) to a Hiragana string, press the HIRAGANA key sequence. In the previous example, the highlighted character "荷" is converted to the Hiragana character "に":
に本_
Similarly, you can convert the string to a Katakana string by pressing the KATAKANA key sequence. In this example, the character will be converted to "ニ":
![]()
![]()
![]()
![]()
![]()
![]()
![]()
If you want to convert Romaji (even after conversion is taken place) to a full-form or a half-form letter string, press the ZENKAKU or HANKAKU key sequence. Full-form letters are two-byte letter characters defined in JIS X0208 while half-form letters are single-byte letter characters defined in ASCII.
Press ZENKAKU:
nihon_,
Press HANKAKU:
nihon_
Note
The ZENKAKU and HANKAKU commands affect the whole Romaji code even if you have converted individual phrases to Japanese characters.
![]()
![]()
![]()
![]()
![]()
![]()
![]()
If you do not want to apply any conversion or restore the original Romaji code after applying conversion, press the MU-HENKAN key.
![]()
![]()
![]()
![]()
![]()
![]()
![]()
The Kana-to-Kanji input method converts Kana into Kanji characters. Each Kana is associated with a key on the keyboard. To invoke the Kana-to-Kanji input method, invoke the "kana" input mode (see Section 7.1, Kana Input Method) and input the Kana characters. The Kana code input is displayed. Use the HENKAN command to start Kana-to-Kanji conversion by pressing the appropriate key sequence. The Kana input is divided into phrases ("BUNSETSU" in Japanese) and converted to Kanji. If the grouping of phrases is not the one desired, press the SHUKUSHOU or KAKUDAI key sequence to revise the grouping of Kana codes and revise the conversion. If the converted phrase displayed is not the desired phrase, press the JI-KOUHO or MAE-KOUHO key sequence to select the next or previous phrase. To display the complete list of characters corresponding to the Kana code, press the ICHIRAN key sequence.
The behavior of the Kana-to-Kanji input method, in many aspects, is very similar to that of the Romaji-to-Kanji input method. Refer to Section 7.2.10, Romaji-To-Kanji Input Method for further information.
![]()
![]()
![]()
![]()
![]()
![]()
![]()
To enter the phrase "変換" using the Kana-to-Kanji input method, you should first invoke the Kana input mode by pressing the appropriate key sequence, as described in Section 7.1, Kana Input Method. On a Japanese keyboard which has a Kana LED, the LED with a label "カナ" will be switched on. If the Keyboard Manager is running on your display, the icon will be changed to indicate the Kana input mode.
![]()
![]()
![]()
![]()
![]()
![]()
![]()
The Hiragana or Katakana code for "変換" is "へんかん" or "ヘンカン" respectively. Therefore, you must press the following keys to enter the Kana code: [ヘ][ン][カ][ン]. These keys are labeled as [=] [Y] [T] [Y] on a standard LK201 or LK401 keyboard. Whether Hiragana characters or Katakana characters are enchoed depends on the customization, as described in Section 7.1, Kana Input Method. By default, Hiragana characters are echoed.
Press [ヘ][ン][カ][ン[ or [=] [Y] [T] [Y]:
![]()
![]()
![]()
![]()
![]()
![]()
![]()
After entering the Kana code, press the HENKAN key sequence (see Table 7-7 to Table 7-11). The Kana character "へんかん" is converted to " 変換":
![]()
![]()
![]()
![]()
![]()
![]()
![]()
Each Kanji character is assigned a unique identification code in the system. These identification codes can be used to enter individual Kanji characters. The DEC Kanji Code Book (Part # - AA-A056C-TE-JO) lists the characters in the DEC Kanji character set, along with their respective internal codes.
![]()
![]()
![]()
![]()
![]()
![]()
![]()
To enter a Japanese character using the Internal Code input method, press the [X] key to indicate the input of hexadecimal code, followed by the four hexadecimal numbers which represent the internal code of the desired character. For example, the internal code for "院" is B1A1. To input the internal code enter [X] [B] [1] [A] [1]:
xb1a1
![]()
![]()
![]()
![]()
![]()
![]()
![]()
Press the KIGOU key sequence to convert the internal code to the desired character.
院
![]()
![]()
![]()
![]()
![]()
![]()
![]()
Each character in the JIS X0208 character set is assigned a particular position in the character plane to uniquely identify that character. To enter Japanese characters using the Ku-ten input method, specify the row and column of the desired character in the character plane. The Ku-Ten code for characters can be found in the DEC Kanji Code Book (Part # - AA-A056C-TE-JO).
![]()
![]()
![]()
![]()
![]()
![]()
![]()
Press the [J] key to indicate the input of row-column code, followed by the 2-digit row-column numbers that represent the desired character. For example, the character "院" is placed in the first column of the 17th row. The JIS Ku-ten code is 1701. Therefore, to input the JIS Ku-ten, press [J] [1] [7] [0] [1]:
j1701
![]()
![]()
![]()
![]()
![]()
![]()
![]()
Press the KIGOU key sequence to convert the internal code to the desired character:
院
![]()
![]()
![]()
![]()
![]()
![]()
![]()