The Prism Program
The Patient panel

After starting the Prism-program, the Patient panel pops up. This panel contains access to the patient database and allows you to create and edit the current case. Furthermore, the Patient panel contains an EXIT button that ends the Prism session.
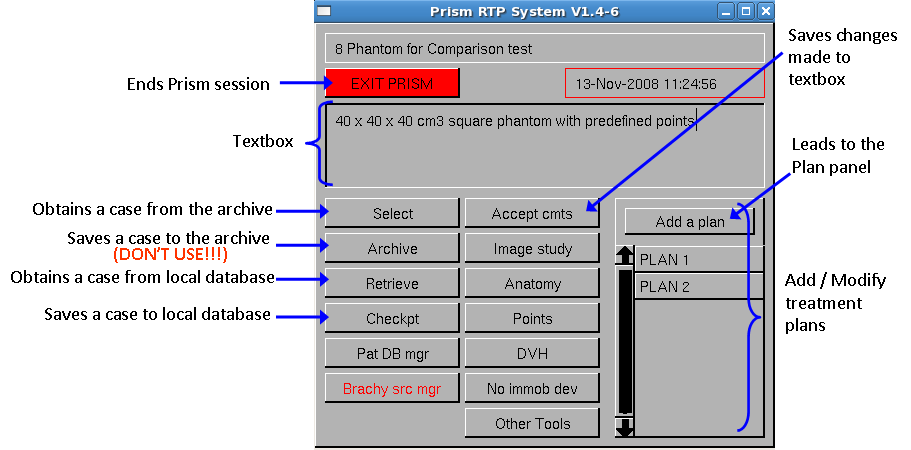
Figure 1: The Patient panel
Functions of the different elements used in this learning module:
-
Select: Used to obtain a case from the archive or to start a new case on a patient by designating the patient from the archive patient list.
When
you press this button a window opens in which you can type a search
string, for example the name of the patient you are looking for.
After pressing “Accept” all patients who match your search string
will be shown in a list. You can also leave this text box empty, then
all patients will be in the list. To choose a patient click on it and
then press “Accept”. Afterwards another list appears in which you
can choose between different plans for this patient. To choose a plan
click on it and then press “Accept” again.
-
Archive: Saves the current case to the patient database (any plans associated with the case are also archived).
THIS BUTTON SHOULD NEVER BE USED BY THE STUDENTS. PLEASE SAVE ALL YOUR WORK WITH THE CHECKPOINT FUNCTION!!! -
Retrieve: Works the same as the Select-button except that it uses a local database for the current user rather than the common database for patient archive data.
After pressing this button you can choose if you want to access your own storage or a storage shared with a group of other Prism users. The following steps are the same as when you press “Select” (see above).
-
Checkpt: Works the same as the Archive-button except that it uses a local database for the current user rather than the shared database for patient archive data.
-
Accept cmts: Used to save any changes made to the textbox above. (If something is changed in the checkbox, this button turns “on”. The modifications made in the textboxes are not saved until the Accept cmts button is pressed and thereby turns “off” again.)
-
Plans: Creation and editing of treatment plans
-
Anatomy: Opens the Prism volume editor
-
Points: Opens the Prism point editor
-
DVH: Opens the Dose-volume histogram panel
-
Image study: Reads the image study associated with the current case from the image database into the working memory. If no image study is yet associated with the case the button acts as a “Select study” button and a query box containing a scrolling list of available image studies pops up when the button is pressed.
-
Other tools: Access to specialized software tools external to the main Prism system
Functions of the different elements not used in this tutorial:
- Pat DB mgr: Opens the Patient database manager-panel
-
Brachy src mgr: Opens the Brachytherapy source manager-panel.
-
Immobilization device: Pops up a menu of the possible immobilization devices.
For further information about the Patient panel: see Prism User’s Reference Manual, p. 89ff.
| << Previous Page |
Top of the Page |
Next Page >> |