The Prism Program
The Volume editor

In this panel, organs, tumours and targets can be created and edited. On the right side of the volume editor there are three selector panels. When an object is added to or selected from one of these panels it becomes the focus of the volume editor panel. Only one object among the three selector panels can be selected at any time. (When the user selects an object, the object previously selected is deselected.) Volatile data is indicated by the “Accept”-button. It turns on when a contour is drawn or modified. To accept and save a contour the user has to turn the “Accept”-button off by pressing it.
In
the volume editor, an object cannot be deleted if it is the currently
selected object.
Please read chapter 17.1, p. 129ff. in Prism User’s Reference Manual to learn about the creation of targets in Prism.
Please read chapter 17.2, p. 131ff. in Prism User’s Reference Manual to learn about the use of the volume editor.
The
volume editor consists of three subpanels, a filmstrip, a contour
editor and an attribute editor, other than the selector panels and
some controls of its own.
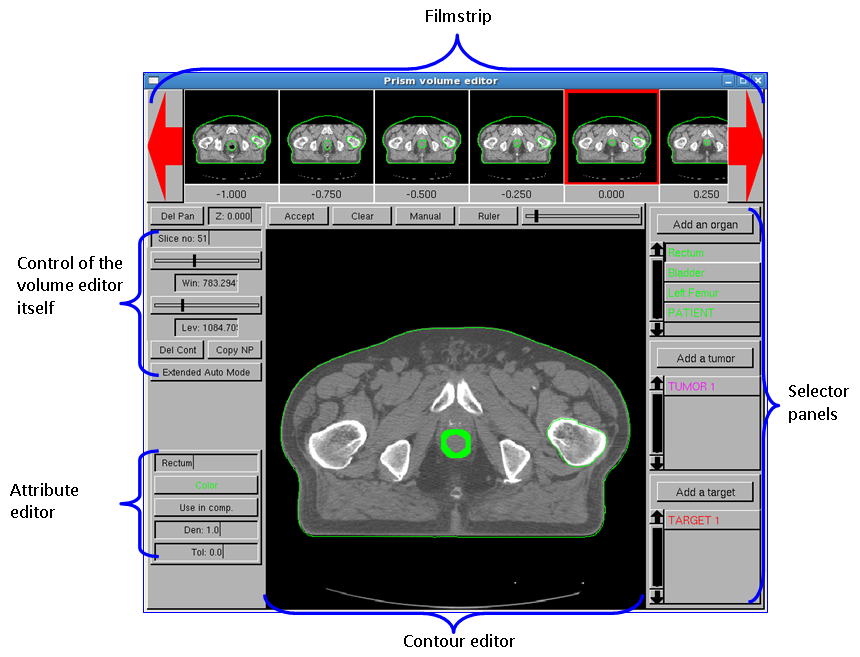
Figure 1: The different panels within the volume editor
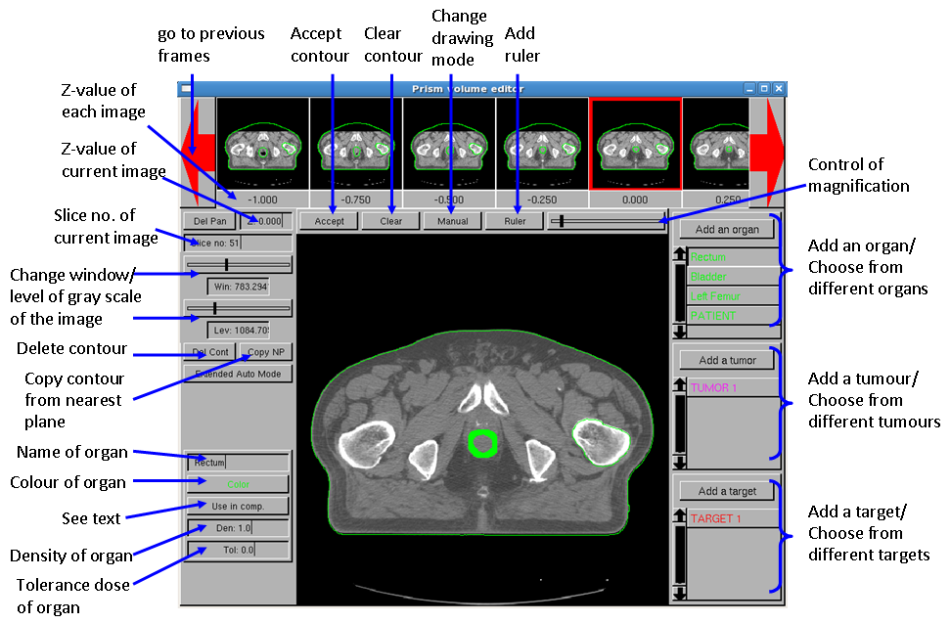
Figure 2: The functions of the different buttons and fields in the volume editor
Functions of the different elements:
-
Volume editor itself:
-
Copy NP: copies the object contour from the nearest plane edited to the current plane (if there are two planes that are both equidistant and closest to the current plane, then the contour from the plane with the lesser z value is copied)
-
Z: this text field displays the value of the transverse plane currently selected, if a new value is entered here, the list of existing planes is searched and the plane with the matching Z value is selected. If the value entered does not match with any of the existing planes the contour editor is reset to an empty plane. When a contour is drawn to this plane and accepted, the new plane is added to the list of planes for this study and appears in the filmstrip.
-
Slice no.: displays the slice number of the image currently displayed
-
Win: controls the gray scale window of the image in the contour editor’s drawing region and the images in the filmstrip’s frames
-
Lev: controls the gray scale level of the image in the contour editor’s drawing region and the images in the filmstrip’s frames
-
Filmstrip: The filmstrip consists of a scrollable, horizontal sequence of transverse images derived from the image study associated with the current plan. The images can be scrolled in either direction with clicking on the red arrow buttons (left-click: one button at a time, centre-click: five frames at a time). Below the images the Z-values of each images are displayed (rounded to the nearest 0.1 mm). Each image also contains contours of any anatomy, tumours or targets in this plane. Clicking the left mouse button while the pointer is on a particular frame in the filmstrip selects the plane and causes it to be displayed at full size in the contour editor.
-
Contour editor: Consists of a drawing region and a control region. It is also used as a component in the block editing panel, the multileaf collimator editing panel and the electron beam cutout contour editing panel.
-
Accept: Causes the contour being edited to be closed, if it was open, and to be added to the current organ, tumour or target. This button must be pressed to update an object with a changed contour, it then turns off. If the button is not on, there is no new data to accept.
-
Clear: causes the contour currently being edited to be erased
-
Ruler: Creates and places an interactive, movable, resizable, reangleable ruler marked in centimetre intervals. Clicking and dragging on either of the grab disks at the ends with the left mouse button causes that end of the ruler to be repositioned, the other end stays fixed. Dragging any part of the spine of the ruler with the left mouse button causes the entire ruler to be relocated along with the pointer. One may delete a ruler with a middle mouse-click and change the ruler’s colour with a right mouse click in the pop-up menu which then appears.
-
Drawing mode button: switches among four modes: Manual, Automatic, Landmark and Digitizer (the mode currently in effect is displayed as the button label, default mode is Manual). Pressing the button brings up a pop-up menu listing the four modes.
-
Magnification scale slider: changes the scale factor at which the graphics in the contour editor is displayed (‘zoom’)
The drawing region: Please read chapter 17.5.6, Prism User’s Reference Manual, p. 136ff. to get information on different functions in the drawing region.
-
Attribute editor: entering or modifying textual or numerical information associated with the anatomical object specified for this volume editor
-
Name: displays the name of the object currently being edited
-
Colour: this button’s label is displayed in the colour associated with the object, when pressed it brings up a popup colour menu, from which another colour can be selected
-
Other attributes for organs:
-
Use in comp-/Ignore in comp-Button: specifies whether the organ is used in dose computation or ignored by the dose computation, pressing the button changes it from one state to another
-
Density: displays the density of the organ or “none” if the organ is ignored by the dose computation, density can be changed by the user, default value is 1.0
-
Tolerance dose: tolerance dose for the organ can be entered here, default value is 0.0
-
-
Other attributes for tumours: Each of the following buttons pops up a menu of the valid choices for each attribute. They are only used in the PTVT automated target generation tool.
-
Site
-
T-stage
-
N-stage
-
Cell type
-
Region
-
Side
-
Fixed or not fixed
-
Pulm Risk
-
-
Other attributes for targets:
-
Site: not yet implemented
-
Prescribed dose: prescribed dose for the target can be eneterd here, default value is 0.0
-
Region: not yet implemented
-
Target type (initial or boost)
-
Nodes: not yet implemented
-
| << Previous Page |
Top of the Page |
Next Page >> |